Cool
The Portrait Collection Photoshop Actions by Felix Kunze Free Download
ATN | PDF | Tutorial
I’ve often been asked how much of the ‘look’ of my images is due to lighting and how much is due to post production. But, while I’m known for lighting, it’s true that I’ve also built up a set of color palettes I’m naturally drawn to. This collection was created to convey these in a simple way, so anyone can recreate the look and feel that I use most often for my studio work.
Each action was created for full customization, every time you use it you will find a new look and feel. Each layer is fully customizable in Photoshop and you can add to it to create your own signature mood. Together with The Lighting Series, this set is the final piece of the puzzle to get beautiful painterly studio work.
THE PORTRAIT COLLECTION PHOTOSHOP ACTIONS
Individual Actions
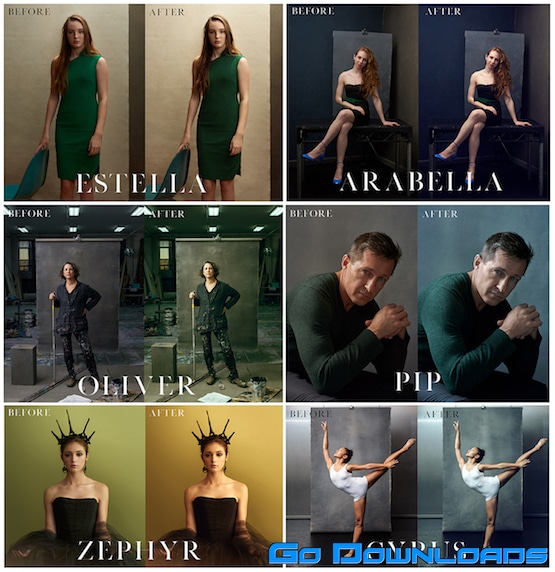
Estella – designed to add a pop for images shot on lighter backdrops, use this to let skin tones pop and to create a subtle contrast in your images.
Arabella – inspired by my work with The Explorers Club, this action lifts your images to make skin tones pop off the screen.
Oliver – We’re going green! This action will give you a starting point for doing some film look color grading, particularly for images with lots of grays and texture.
Pip – Designed to give toning to portraits of men, a cool and moody look for your portraits that desaturates skin tones and adds pop.
Zephyr – Named after the natural phenomenon of ‘warm air rising’, this warning action intensifies skintones. This one can be used to bring tones together into a warmer feeling.
Cyrus – Similar to Oliver, this one is for toning in Cyan and works beautifully with all skin tones to give them an editorial, yet lively feel.


